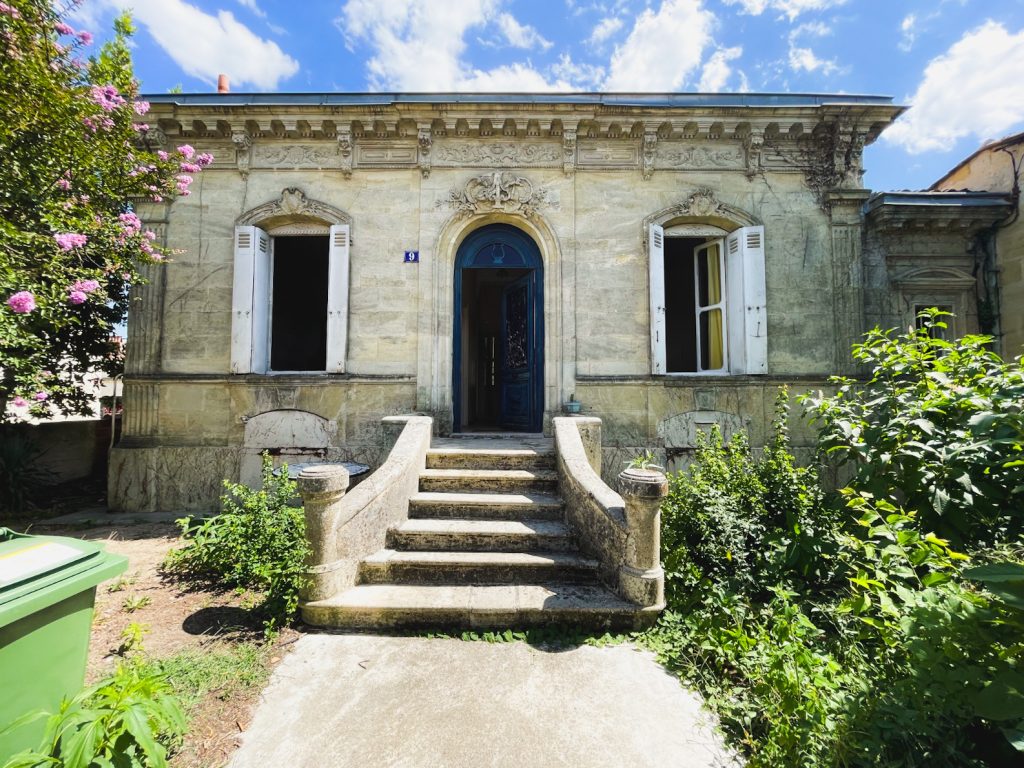
Two years ago, we picked up the keys to a 19th century house in southwest France. At the time, it was equal parts dream and disaster: crumbling plaster, a failed roof in places, black mould, decades of accumulated grime, and the kind of structural issues that make even the most optimistic renovator pause. But we saw past all of that. We saw the bones of a beautiful home, the traces of its original character, and the potential to turn it into something truly special.
Now, two years on, some rooms are finished and feel like they have always been ours. Others remain firmly in the “work in progress” category. That is the reality of renovating an old French house on a budget: you learn to live comfortably alongside chaos, celebrating each completed room while stepping over dust sheets to get to the next one.
What follows is a complete room-by-room tour of our home as it stands today. We will walk through what we found when we arrived, the decisions we made along the way, the compromises we wrestled with, and the results we are most proud of. If you are considering buying an old property in France, or if you are mid-renovation yourself and need reassurance that it does eventually come together, this one is for you.
The Outside: First Impressions and Hidden History
Our home sits at around 120 square metres, which for the two of us is the perfect size. It has three bedrooms, two bathrooms, and a layout that feels generous without being overwhelming to maintain or heat. In French property terms, it is a modest house, but modest in France often comes with features that would be considered luxuries elsewhere.
We have two distinct gardens, each with its own personality. The front garden is shaded by mature trees, creating a cool, dappled retreat that becomes essential during the intense summer months in Bordeaux, when temperatures regularly climb above 35 degrees. The back garden faces south and is absolutely drenched in sunshine from morning until evening. It is where we spend most of our time outdoors, eating long lunches, reading, and watching the seasons change. There is something deeply satisfying about having both options available depending on the weather and the mood.
Being in the Bordeaux region, the house also comes with an extensive cellar, which is typical of properties built in this area during the 1800s. Cellars were essential for storing wine, preserving food, and keeping cool during the hot summers. Ours is wonderfully atmospheric, all stone walls and vaulted ceilings, and yes, we do use it for wine storage. When in Bordeaux, as they say. We also have a well in the garden, another common feature of houses from this era that speaks to a time when properties needed to be more self-sufficient.
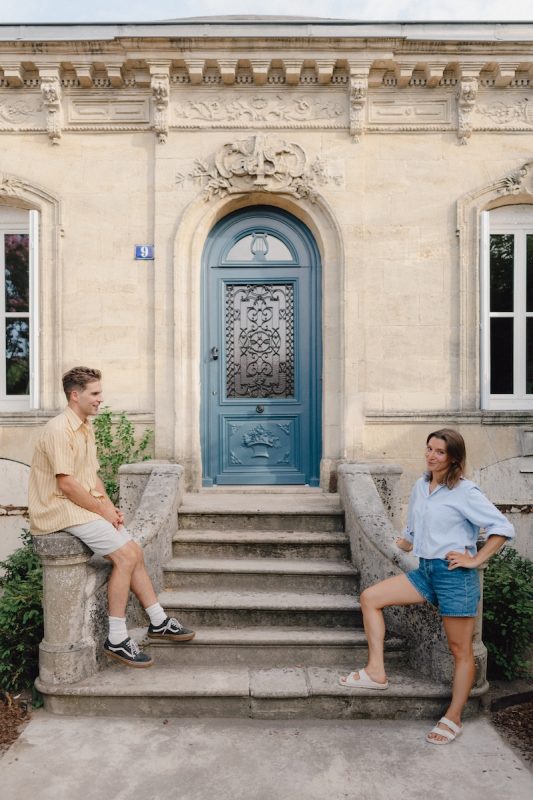
The history of the house is one of the things we love most about it. We believe it was built in the mid-1800s by the first violinist of the Bordeaux orchestra. If you look closely at the stone facade, you will spot charming musical details carved into the stonework, including a little lyre motif above the front door. These kinds of personal touches are what make old houses so special. Someone, over 150 years ago, wanted to leave their mark on this place, to declare who they were and what mattered to them. That sense of personal history layered into the very fabric of the building is something you simply cannot replicate in new construction.
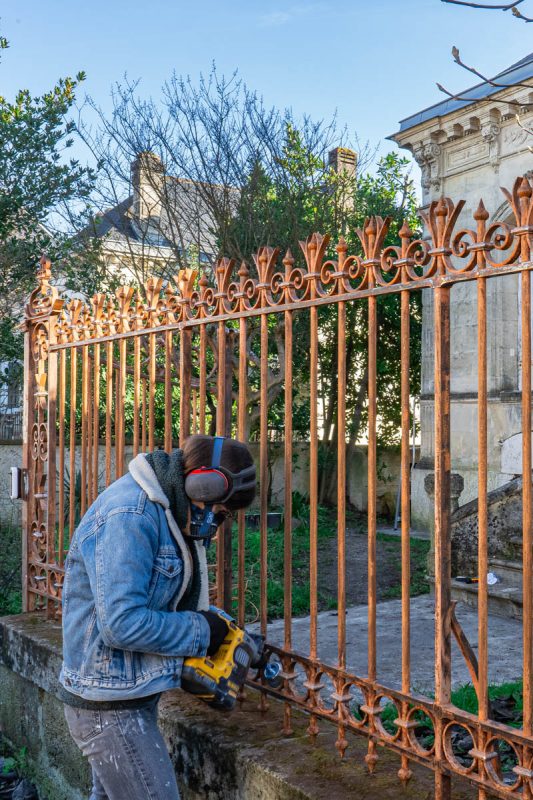
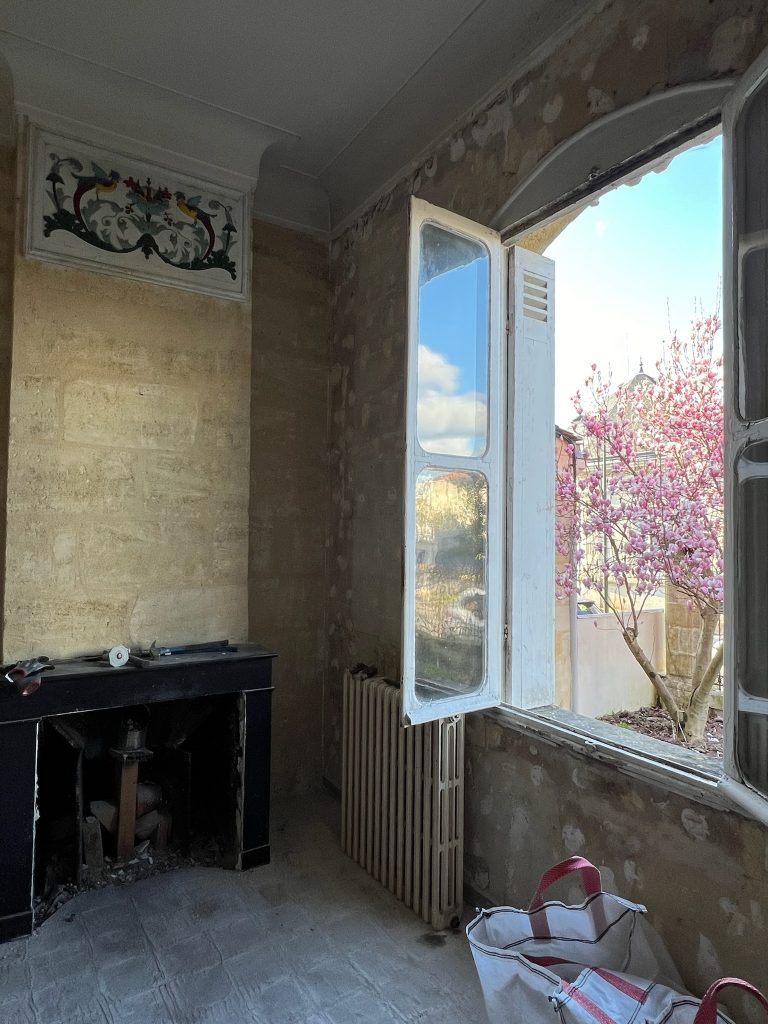
The exterior stonework is in reasonable condition for its age, though it will need repointing in places over the coming years. The shutters, as is common across France, are an essential part of the house’s character and its thermal management. We have slowly been repainting them, a tedious job that involves stripping back layers of old paint, treating the wood, and applying fresh coats in a colour that complements the pale Bordeaux limestone. It is the kind of quiet, unglamorous maintenance work that old houses constantly demand.
The Hallway: Saying Goodbye to Save the Future
Walking through the front door, you enter the hallway, and this is where our renovation story really begins. When we first viewed the house, this space took our breath away, but not entirely for the right reasons. The original mouldings on the ceiling and walls were absolutely stunning, intricate plasterwork that spoke of the craftsmanship of the period. They were the kind of details that make you fall in love with a house on the spot.
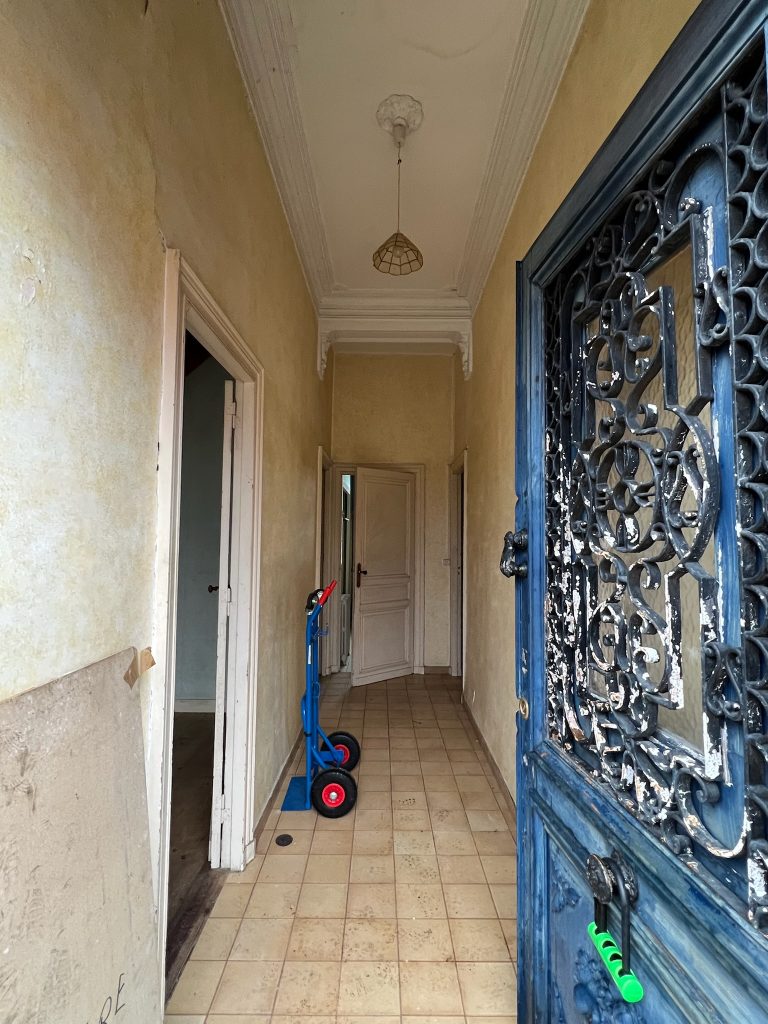
Unfortunately, they were also in terrible condition. Years of moisture ingress, movement in the building, and simple neglect had left them cracked, crumbling, and in some cases hanging dangerously loose. Worse still, when we had the house properly surveyed, we discovered that to make the property comfortable and energy-efficient, we would need to insulate the exterior walls from the inside. In France, many older stone houses have no insulation whatsoever, which means they are freezing in winter and can develop serious condensation and mould problems. Internal insulation was not optional for us; it was essential for making the house liveable year-round.

The heartbreaking consequence was that adding insulation to the walls meant losing the original mouldings. There was no way to insulate behind them and keep them intact. This was one of the hardest decisions we have made in the entire renovation. Purists might argue we should have found another way, but the reality of living in an uninsulated stone house through a Bordeaux winter, where temperatures can drop to minus five, made the choice for us.
What we did do, as a compromise with our consciences, was preserve the mouldings above the new lowered ceiling. They are still there, hidden but intact, waiting for a future owner who might have the budget, the skill, or the technology to restore them properly. It felt important to us not to destroy them outright, even if we could not save them ourselves.
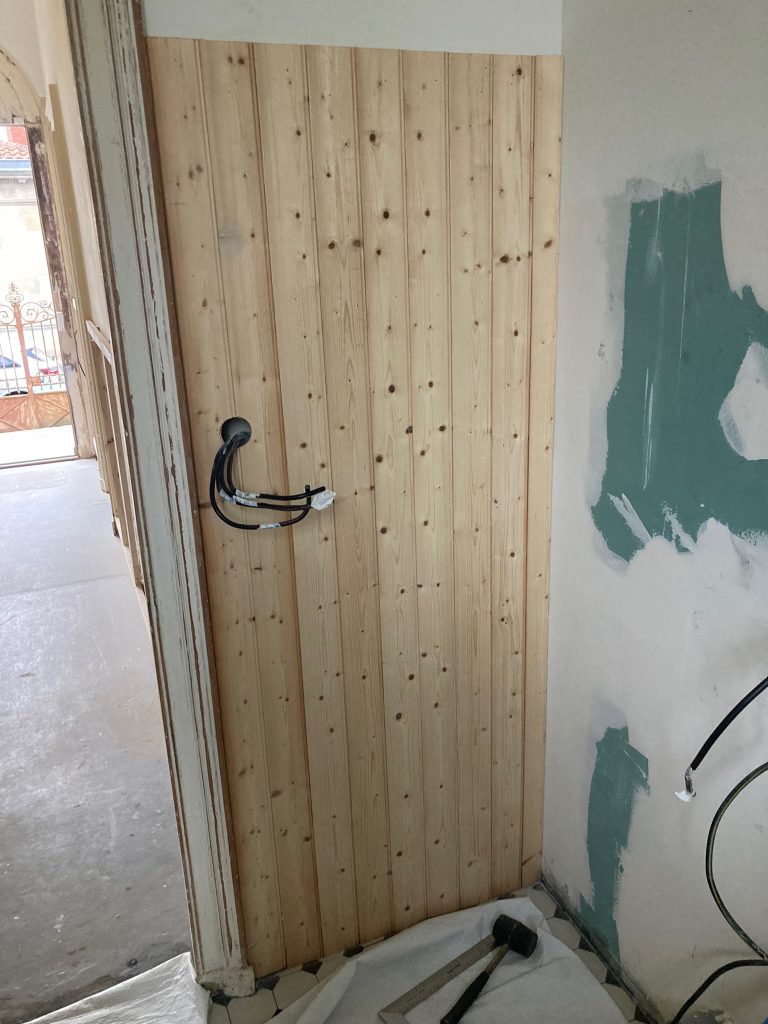
With the insulation in place and a new, lower ceiling installed, we turned our attention to making the hallway beautiful in a different way. The floor was covered in dated 1970s tiles that had no business being in a 19th century house. We ripped them out and replaced them with a classic black and white checkered pattern, a timeless choice that feels right for the period and adds a sense of elegance to the entrance.
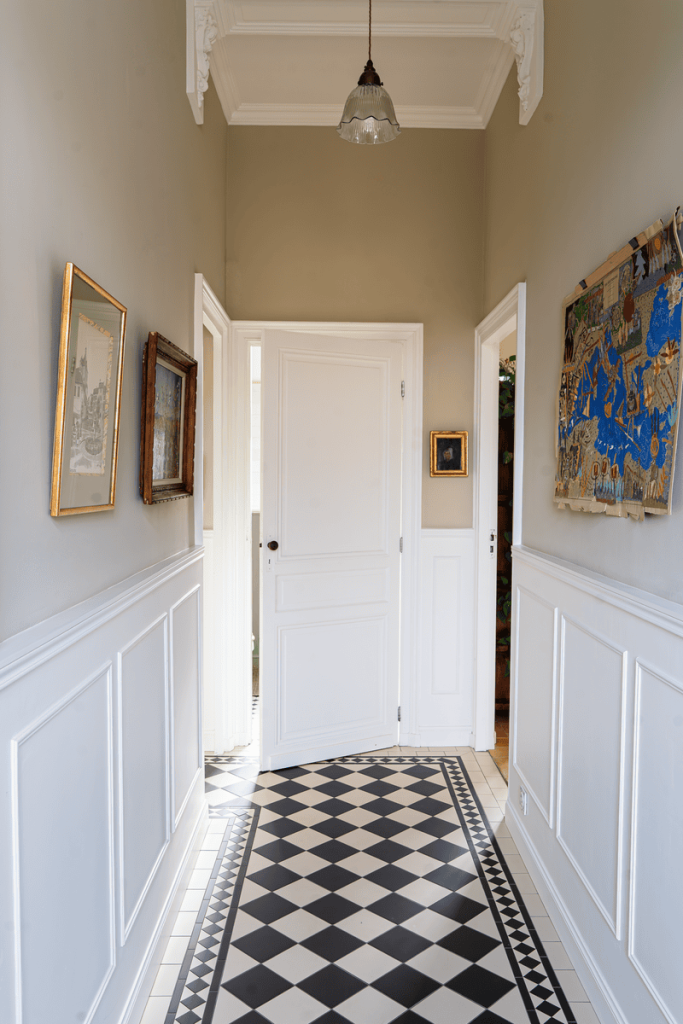
The lower sections of the walls, where the plaster was beyond saving, were removed entirely. In their place, we installed wall panelling with decorative mouldings, a nod to the original period details but executed in a way that works with the insulated walls. The panelling gives the hallway a clean, classic look and neatly hides the less-than-perfect walls underneath. Painted in a soft, warm white, it makes the space feel welcoming and sets the tone for the rest of the house.
The Kitchen and Dining Room: From Disaster to Dream
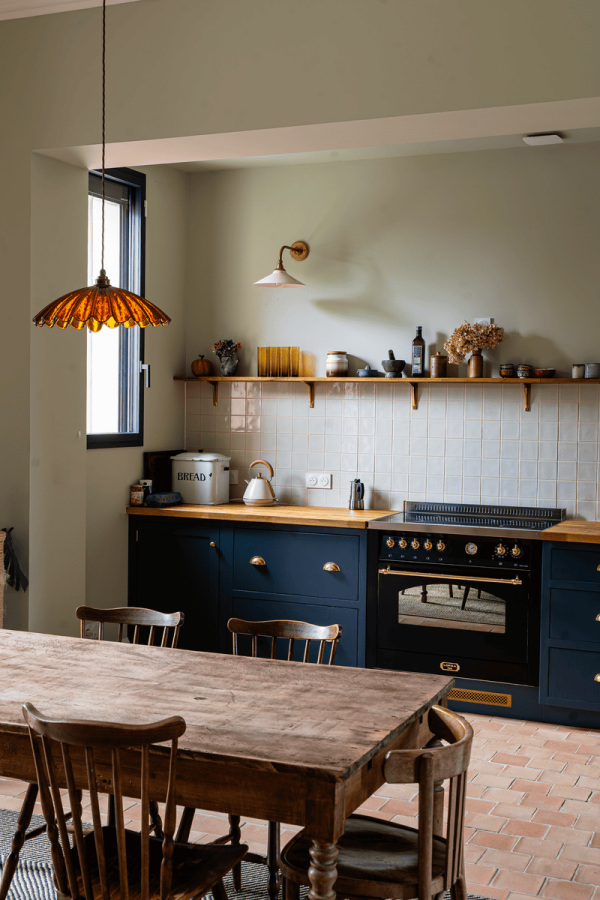
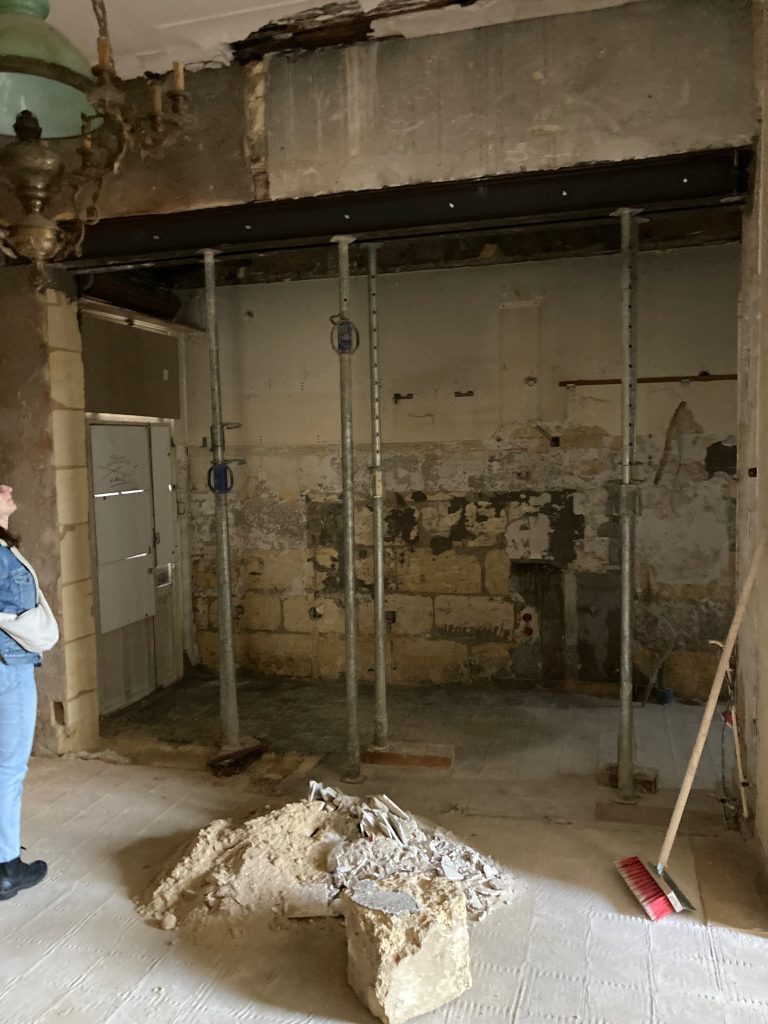
If there is one room in the house that represents the full arc of our renovation journey, from despair to delight, it is the kitchen and dining room. When we bought the house, this area was in the worst condition of any room. The roof above had partially failed, allowing water to pour in over what must have been years. The result was black mould that coated the walls and ceiling, a health hazard that had to be addressed before anything else. On top of that, the kitchen itself was tiny, carved out of what had once been a larger room, and every surface was coated in thirty years’ worth of kitchen grease. It was genuinely grim.
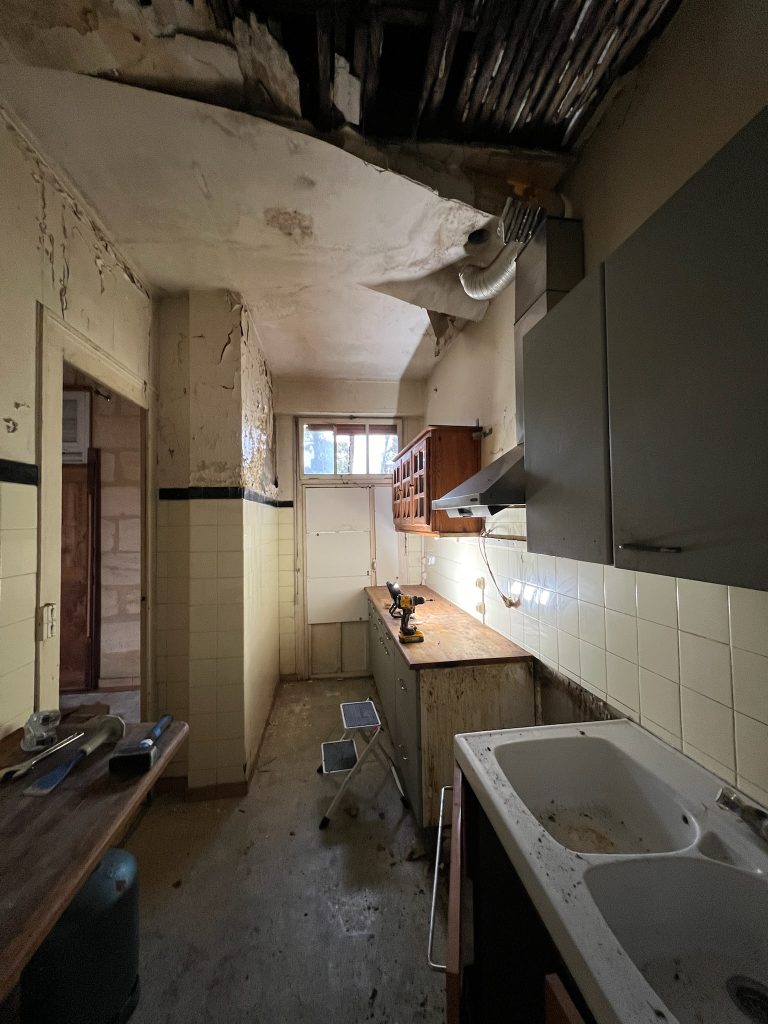
The first major structural decision we made was to knock down a load-bearing wall between the old kitchen and the adjacent dining room. This required proper engineering, steel beams, and building permits, but the result was transformative. Suddenly, instead of two cramped, dark rooms, we had one generous, open-plan kitchen and dining space that felt like the heart of a home should. We also converted an old doorway into a window, which not only brought in more natural light but gave us additional counter space along that wall. These kinds of layout changes are where renovating an old house really pays off: you can reshape rooms to suit how people actually live today while keeping the overall character of the building intact.
With the structure sorted, the roof repaired, and the mould professionally treated, we could finally turn to the fun part: designing our dream kitchen. Like so many people, we fell completely in love with deVOL Kitchens. Their Shaker-style cabinets, beautiful hardware, and earthy colour palettes were exactly what we envisioned for our French home. The problem, as anyone who has priced a deVOL kitchen will know, is that they are eye-wateringly expensive. A full kitchen from deVOL would have consumed a significant portion of our entire renovation budget.
So we did what we have done throughout this renovation: we decided to build it ourselves. Hugo, who had never made a piece of furniture in his life before this project, took on the challenge of building every single kitchen cabinet from scratch. He researched construction techniques, invested in a few key woodworking tools, and taught himself as he went. The learning curve was steep, and there were moments of frustration, but the results speak for themselves. The cabinets are solid, beautifully proportioned, and look remarkably similar to the deVOL designs that inspired them.
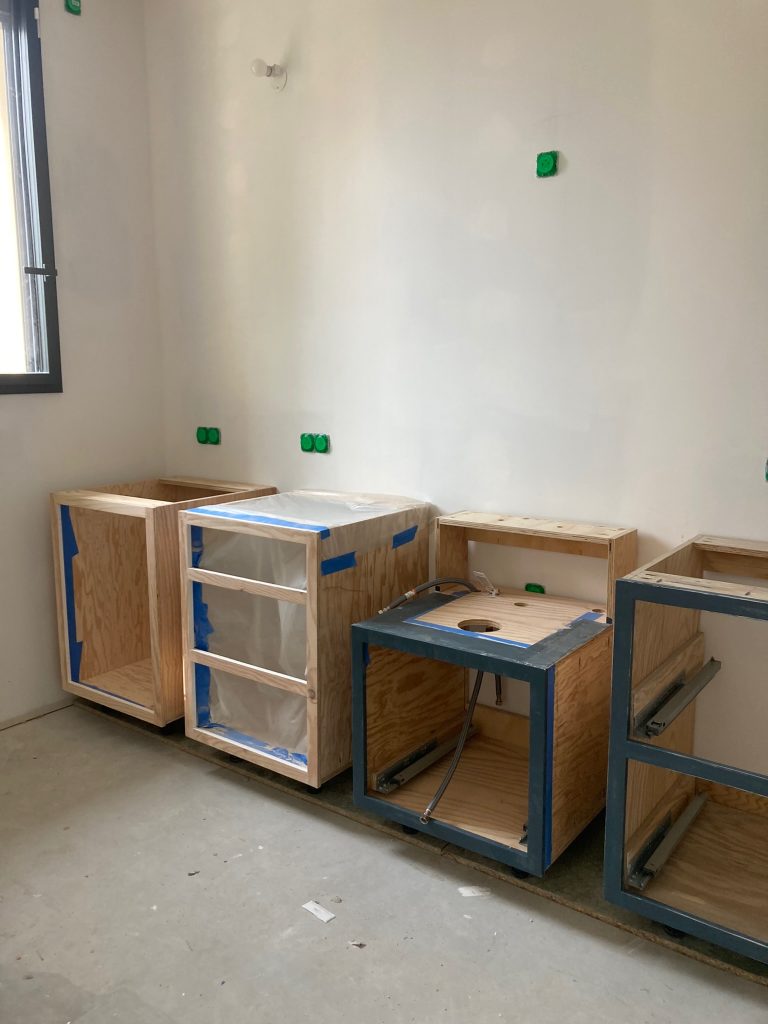
He even cut the stone countertops himself, a job that most people, quite reasonably, would leave to professionals. But by this point in the renovation, we had learned that with enough research, the right tools, and a willingness to take things slowly, you can achieve results that rival professional work at a fraction of the cost. The total materials cost for all the kitchen cabinets came to just 1,200 euros. To put that in perspective, a single deVOL base unit can cost more than that.
This approach, doing the labour ourselves and investing the savings in quality materials, has become the guiding philosophy of our entire renovation. We would rather spend weeks building something with our own hands and use the money we save to buy better tiles, better paint, better hardware. The result is a home that looks and feels expensive but was achieved on a very modest budget.
For the kitchen floor, we chose terracotta tiles, a material that feels absolutely right in a French home of this period. Terracotta has been used in buildings across the south of France for centuries, and there is a warmth and earthiness to it that no other flooring material can quite match. We sourced untreated terracotta tiles for that lovely raw, rustic appearance and laid every single tile ourselves. The laying process was labour-intensive but straightforward, and the satisfaction of seeing the floor come together tile by tile was immense.

Treating untreated terracotta is an art in itself. The tiles need to be sealed to protect them from stains and moisture, but the wrong sealant can destroy their beautiful matte finish and make them look plasticky. We researched extensively and found specialist products that protect the tiles while preserving their natural, chalky texture. The result is a floor that looks like it has been there for a hundred years, which is exactly the effect we were after.
The Living Room: Embracing the Dark
Our living room faces north, which in interior design terms means it receives little to no direct sunlight. For many people, this would be a problem to solve, typically with pale walls, mirrors, and as much artificial light as possible. We took the opposite approach. Since we use the living room primarily in the evenings, for reading, watching films, and relaxing after dinner, we decided to lean into the darkness and create a space that feels deliberately cosy and enveloping rather than fighting a battle against the light that we could never win.
The centrepiece of the room’s transformation is the wallpaper. I had been longing to use a bold, patterned wallpaper somewhere in the house, and the living room felt like the perfect canvas. We chose Vine by William Morris, one of his most iconic designs, featuring rich, trailing grapevines with lush green leaves against a deep black background. It is a design that divides opinion, and we are well aware it is not to everyone’s taste. But for us, it is perfect.
The green leaves echo the sage and green tones we have used in the dining room, creating a visual connection between the spaces. And the grapevine motif feels like a wonderfully appropriate choice for a house in Bordeaux, the wine capital of the world. There is a playfulness to it that we love, a little wink to our surroundings that visitors always notice and smile at. William Morris wallpapers are not cheap, but they are printed on heavy-weight paper with rich, saturated colours that no modern reproduction quite matches. It is one of those investments where you can see and feel the quality every single day.

The biggest practical addition to the living room this year was the custom built-in bookcase that Hugo designed and built. It spans an entire wall, floor to ceiling, and has completely transformed how the room functions. Before the bookcase, our books were stacked in piles around the house, stuffed into boxes, and generally in disarray. Now they are properly displayed, organised, and accessible, which if you are a book lover, you will understand is enormously satisfying.
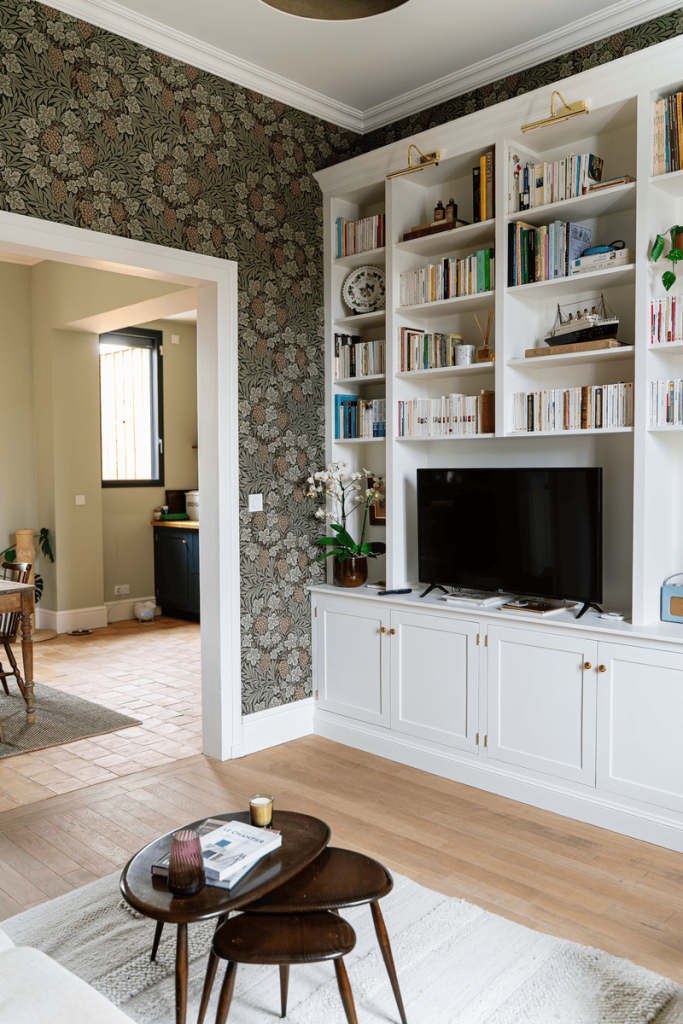
Building a floor-to-ceiling bookcase in an old house is more challenging than it sounds. The walls are not straight, the floor is not level, and the ceiling has its own ideas about where it wants to be. Every shelf had to be individually measured and cut to fit the specific quirks of the room. But the result is a piece of furniture that looks like it has always been there, as though the room was designed around it rather than the other way around. That is the goal with all our built-in pieces: they should feel inevitable, as though the house demanded them.
The Bathroom: Small Space, Big Decisions
The bathroom is the smallest room in the house, but it was hands down the most complex to design and execute. There is something about bathrooms that concentrates all the most difficult aspects of renovation into one tiny space: plumbing, waterproofing, tiling, electrical work for lighting and heating, ventilation, and an almost infinite number of product choices at wildly varying price points. Every single element, from the shower tray to the tap handles, requires a decision, and every decision has cost and aesthetic implications.
When we started planning the bathroom, the layout had already been completely reimagined as part of the wider reconfiguration of the house. All the plumbing had been redone from scratch, which gave us total freedom in terms of where to position things but also meant there was no existing infrastructure to build on. We were starting from a bare room with pipes sticking out of the floor and walls.
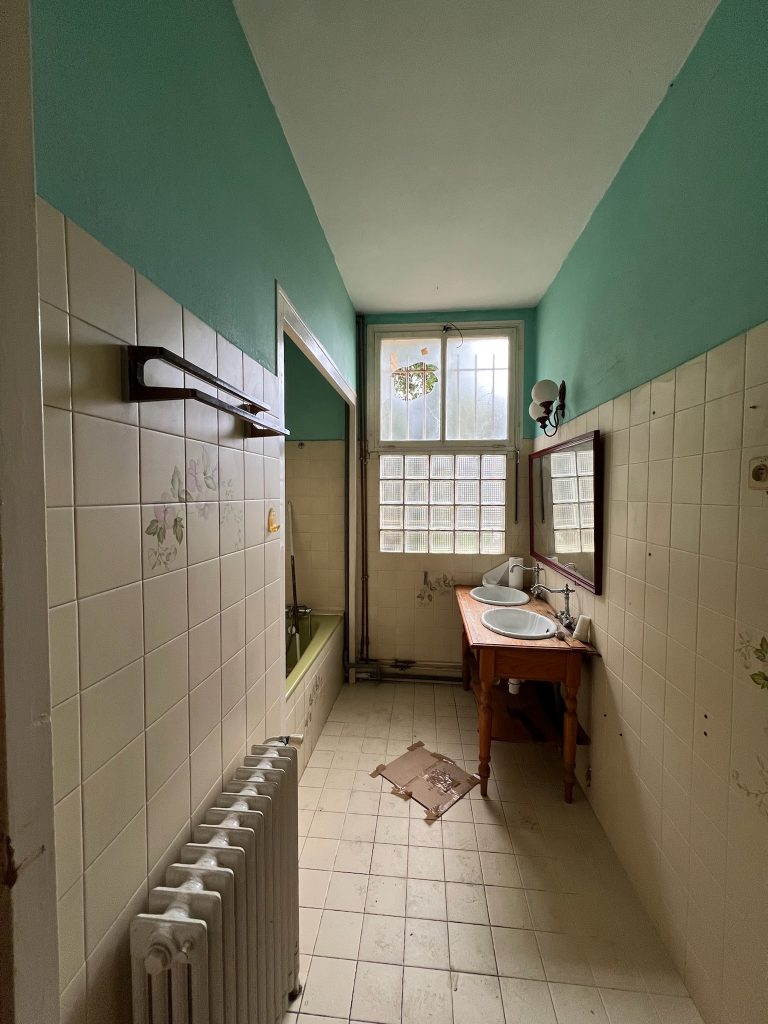
The key design decision was positioning a walk-in shower to make the most of the window overlooking the back garden. Having natural light and a view of greenery while you shower might sound like a small thing, but it makes an enormous difference to the daily experience of using the room. The shower feels open and airy rather than claustrophobic, which is especially important in a small bathroom where every design choice either opens the space up or closes it down.
To keep costs under control, we got creative with materials. The previous owners had left behind a quantity of wood cladding, the kind typically used for exterior walls or outbuildings. Rather than disposing of it, we repurposed it as wall panelling in the bathroom. Painted in Lichen by Farrow and Ball, a soft, silvery green that perfectly complements the natural light from the garden window, the cladding adds texture and warmth to the room while costing us essentially nothing in materials.
For the vanity unit, we took a similar approach. Instead of buying a purpose-built bathroom vanity, which can easily cost several hundred euros for anything decent, we found an old chest of drawers. It had the right proportions for the space and a classic design that suited the house. We topped it with a custom granite countertop, cut to fit the chest perfectly, and installed a basin on top. The result is a vanity that looks bespoke and characterful, with plenty of storage in the drawers, at a fraction of the cost of a retail equivalent.
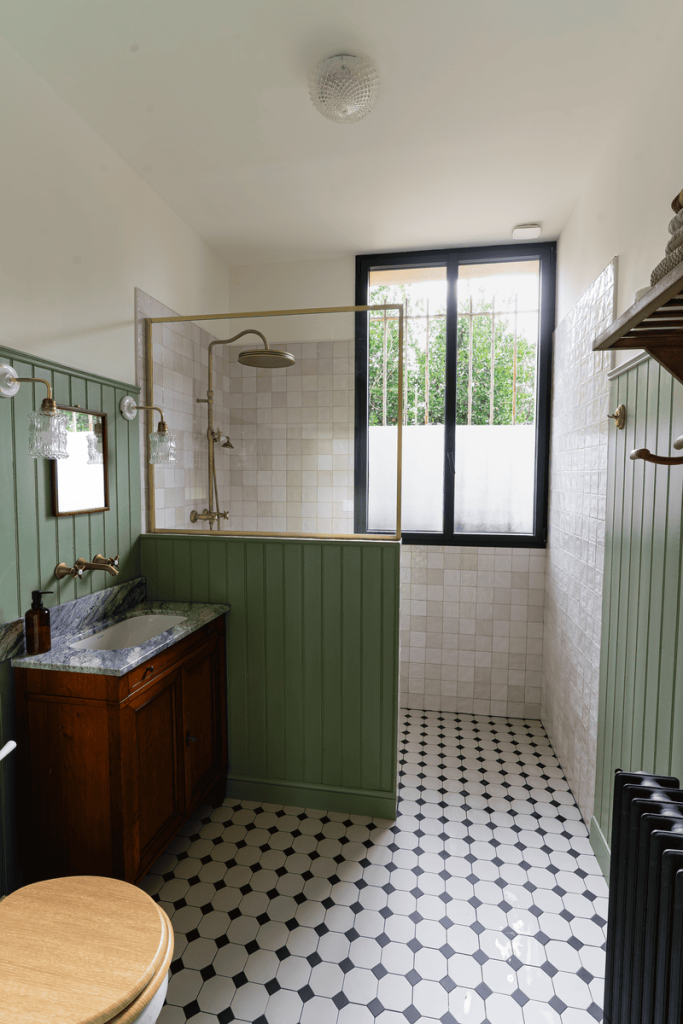
The finished bathroom is one of the rooms we are most proud of. Despite being small, it feels bright, welcoming, and considered. The walk-in shower, with its view of the garden, has become a genuine everyday luxury. The combination of the Farrow and Ball panelling, the repurposed vanity, and carefully chosen fixtures creates a room that feels cohesive and calm. It proves that you do not need a large budget to create a beautiful bathroom; you need good taste, a willingness to think creatively about materials, and the patience to get the details right.
The Bedroom: From Plain White Box to Personal Sanctuary
The bedroom was our most recent project, and in some ways, it was the one that taught us the most about the difference between a room that is finished and a room that feels like home. When we completed the initial renovation of the house, the bedroom was functional: freshly plastered and painted white walls, a ceiling, a floor, a door. It was fine. It was also completely devoid of personality and, more practically, had absolutely no storage. We were living out of boxes and suitcases, hanging clothes on a portable rail, and generally making do in the way that renovators become experts at.
After two years, we decided enough was enough. The bedroom deserved proper attention, and we deserved to stop living out of cardboard boxes. The brief was twofold: give the room some character and personality, and create serious, grown-up storage that would actually work for our lives.
The solution Hugo designed was a wrap-around wardrobe with an integrated headboard. The wardrobe runs along two walls of the room, providing an enormous amount of hanging space, shelving, and drawers, more storage than we have ever had. The headboard section is built into the wardrobe structure, creating a sense of architectural intention, as though the room was designed as a single, unified piece rather than assembled from separate bits of furniture.
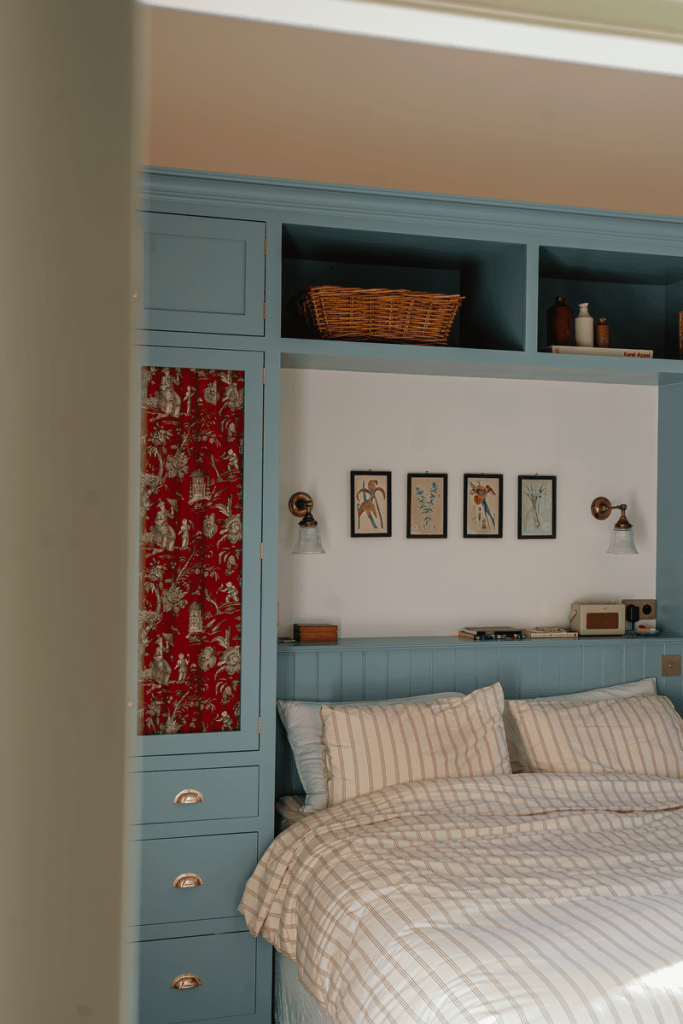
The colour we chose for the wardrobe is a rich, deep blue that transforms the mood of the room entirely. Against the blue, we added fabric panels and curtains that soften the space and add warmth and texture. The combination of the structured carpentry of the wardrobe and the softness of the fabric creates a room that feels balanced, a place that is both practical and genuinely beautiful to spend time in.
The bedroom project also reinforced something we have learned throughout this renovation: the rooms that make the biggest impact are not necessarily the ones where you spend the most money. The wardrobe was built from standard materials, the fabric was sourced affordably, and the paint was a single, well-chosen colour. What makes it work is the design, the proportions, the way the elements relate to each other. Good design costs nothing; it just requires thought, patience, and a willingness to iterate until things feel right.
What Comes Next: The Road Ahead
The tour of our completed rooms paints a rosy picture, but the reality is that a significant portion of the house remains firmly in the “work in progress” category. The office is currently a functional but uninspiring space that needs the same kind of attention we have given to the other rooms. And the attic, a large space that runs the full length of the house, is completely unfinished.
In 2026, our plan is to tackle the office first, giving it proper built-in furniture, good lighting, and a design that makes it a pleasant place to spend working hours. After that, the big project: converting the attic into two additional bedrooms and a bathroom. This will be our most ambitious undertaking yet, involving structural work to reinforce the floor, the installation of dormer windows to bring in light and headroom, and a full fit-out of the new rooms from scratch.
The attic conversion will effectively double the usable space of the house and transform it from a comfortable home for two into a place where we can properly welcome guests, accommodate a growing family, or even offer part of it as a holiday rental. It is a project that excites and terrifies us in equal measure, which, after two years of renovation, we have come to recognise as exactly the right feeling to have at the start of something worthwhile.
Lessons from Two Years of French Renovation
If there is one thing we have learned from this experience, it is that renovating an old house in France is as much a psychological journey as a practical one. You need resilience, because things will go wrong in ways you never anticipated. You need flexibility, because the house will tell you what it needs, and it will not always match your original plan. And you need a sense of humour, because there will be days when the only reasonable response to what is happening around you is to laugh.
We have also learned the immense value of doing things ourselves. Not because we are particularly skilled, we were complete beginners when we started, but because the process of learning to build, tile, plaster, and paint has given us a connection to our home that we would never have if we had simply written cheques and let professionals do everything. Every room carries the memory of making it. We know where every tile was laid, where every shelf was hung, where every difficult cut was made. The house is not just where we live; it is something we built together, quite literally, with our own hands.
The financial approach we have taken, investing our time rather than our money, has made the renovation possible on a budget that many people would consider too small for a project of this scope. Our kitchen cabinets cost 1,200 euros because Hugo built them himself. Our bathroom vanity cost almost nothing because we repurposed an old chest of drawers. Our hallway panelling was affordable because we installed it ourselves rather than hiring a carpenter. These savings, multiplied across every room in the house, add up to tens of thousands of euros that we simply did not have to spend.
But perhaps the most important lesson is about patience. A renovation of this kind cannot be rushed. Old houses reveal their problems slowly, and the best solutions often require time to research, plan, and execute properly. We have learned to work at the pace the house sets rather than imposing our own timeline. Some rooms have taken months longer than we expected. Others came together faster than we dared hope. The key is to keep moving forward, one room at a time, one decision at a time, trusting that it will all come together eventually.
Two years in, we are more in love with this house than the day we bought it. Not because it is finished, it is far from that, but because we can see what it is becoming. Every completed room is proof that the vision we had on that first visit was not naive optimism but a genuine possibility. And every unfinished room is a promise of what is still to come.