Renovating a bedroom might sound straightforward compared to tackling structural walls or replumbing an entire house. But when that bedroom sits inside a 200-year-old Chartreuse in southwest France — a building that has weathered two centuries of Atlantic storms, neglect, and a few questionable modernisation attempts — nothing is ever simple. After three months of concentrated work, our bedroom is finally finished, and the transformation has been one of the most satisfying milestones in our entire restoration journey.
This post walks through every stage of the project: the problems we inherited, the structural repairs that had to come first, the design decisions that gave the room its personality, and the practical lessons we picked up along the way. Whether you are renovating a historic property yourself or simply enjoy watching old buildings come back to life, we hope there is something here for you.
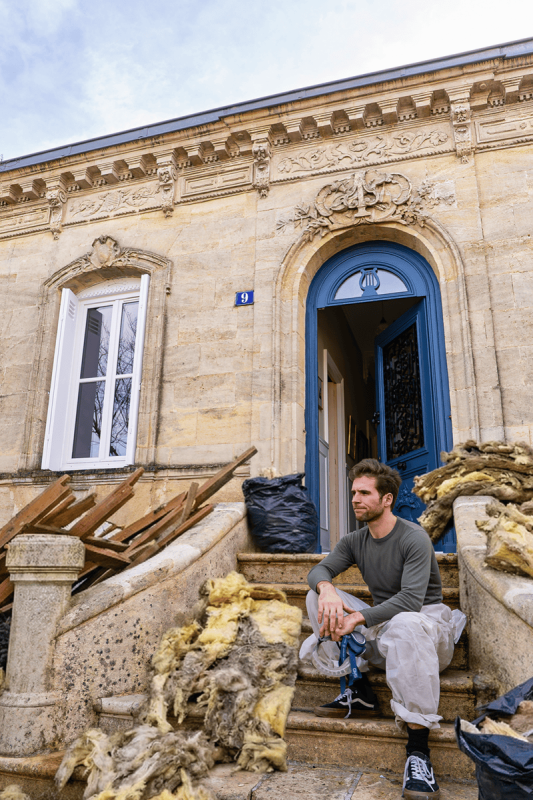
What We Inherited: The State of the Bedroom When We Got the Keys
When we first walked into this room during our initial viewing of the Chartreuse, it was immediately clear that this was not going to be a quick coat-of-paint situation. The walls were spotted with mould — not surface-level condensation mould, but the deep, persistent kind that tells you moisture has been getting in for years. Sheets of plasterboard had been fixed directly onto the original stone walls at some point in the past, presumably to create a smooth, modern surface. Unfortunately, this had done exactly what trapping moisture behind plasterboard always does: it had created a perfect environment for damp to thrive unseen.
Beyond the damp, there was a literal hole in one of the walls that needed attention. The gutters on the exterior above the bedroom were in a sorry state, meaning rainwater had been cascading down the stone facade and finding its way inside. The window was an ancient single-glazed plastic unit — functional in the loosest sense of the word, but offering almost no insulation and doing very little to keep the cold Bordeaux winters at bay. The room felt cold, neglected, and unwelcoming.
But there was one redeeming feature that made us determined to save this room: the original floorboards. This is one of only two rooms in the entire Chartreuse where the original flooring has survived intact. Those boards have been walked on for two hundred years, and they have a patina and character that simply cannot be replicated. Preserving them was non-negotiable from day one.
Structural First: Gutters, Windows, and Damp Remediation
Before we could even think about aesthetics, we had to address the root causes of the problems. Renovation of historic buildings always follows the same iron rule: fix the structure first, then make it beautiful. Ignore the structure, and whatever beauty you add will eventually be undermined.
Replacing the Gutters
The first job was sorting out the gutters above the bedroom. The existing ones were corroded, misaligned, and in some places had pulled away from the fascia entirely. Every time it rained — and it rains plenty in this part of France — water would sheet down the exterior wall, soaking the stone and eventually working its way through to the interior. We replaced the entire gutter run with new zinc guttering, properly aligned with a slight fall toward the downpipe. It is one of those invisible jobs that makes an enormous difference. Once the gutters were functioning correctly, the exterior wall began to dry out for the first time in years.
Window Replacement
Next came the window. The old plastic frame was removed and replaced with a properly insulated double-glazed unit. Choosing the right window for a historic property is always a balancing act between energy efficiency and aesthetic sympathy. We wanted something that would keep the room warm in winter without looking jarringly modern against the stone walls. The new window makes a remarkable difference to both the temperature and the light quality in the room — it is genuinely hard to overstate how much a single good window can change a space.
Removing Plasterboard and Treating Damp
With the external water ingress stopped, we turned our attention to the interior walls. The plasterboard sheets had to come off. Removing them revealed the original stone beneath — beautiful in places, damaged in others, but at least now able to breathe. Stone walls in old French houses are designed to be breathable; they absorb and release moisture naturally. Sealing them behind impermeable plasterboard disrupts this cycle completely, which is exactly what had caused the mould.
Once exposed, the walls needed time to dry out properly. We treated the affected areas, repaired the hole in the wall, and then applied a breathable lime render in the places where the stone needed covering. Lime plaster works with the stone rather than against it, allowing moisture to pass through while still providing a smooth, finished surface. It is slower to apply than modern plaster and requires more skill to get right, but for a building of this age, it is absolutely the correct approach.
Insulating Without Compromising the Walls
Insulation was another area where we had to be thoughtful. You cannot simply stuff modern insulation boards against old stone walls without risking the same moisture problems that the plasterboard had caused. We chose a breathable insulation solution that allows the walls to continue their natural moisture cycle while still improving the thermal performance of the room. It is a compromise — you will never achieve the same U-values as a new build — but it is a compromise that respects the building and keeps it healthy for the next two hundred years.
Restoring the Original Floorboards
With the walls sorted, we turned to the floor. Restoring original floorboards in a property this old is nerve-wracking work. These are not modern engineered boards that can be lifted and replaced; they are solid planks of hardwood that have been in place for two centuries, each one slightly different in width and thickness, each one bearing the marks of generations of use.
The boards needed careful sanding to remove the accumulated grime and old finishes without taking off too much material. Every pass with the sander felt like a negotiation between revealing the beauty of the wood and preserving its thickness. Some boards had small areas of damage that needed patching, and a couple of gaps between boards needed filling. We used a traditional mixture of wood dust and resin to fill the gaps, which allows for the natural expansion and contraction of the timber with seasonal changes in humidity.
Once sanded, we finished the boards with a hard wax oil that brings out the grain and provides a durable, water-resistant surface without creating a plastic-looking sheen. The result is warm, characterful, and utterly unlike anything you could buy new. Standing back and looking at those finished floors was one of the proudest moments of the entire renovation.
The First Attempt at Decoration: Decision Fatigue and the All-White Phase
With all the structural work finally complete, we painted everything white. Walls, ceiling, trim — the lot. And let us be honest about why: it was not a considered design choice. It was decision fatigue, pure and simple.
At the time we were finishing the bedroom, the entire ground floor of the Chartreuse was also being renovated simultaneously. We were making dozens of decisions every day about materials, finishes, layouts, and colours for multiple rooms at once. By the time we got to the bedroom, we had nothing left in the tank. White felt safe, clean, and easy. It would give us a liveable room so we could finally move out of our rented flat and into the house.
And it served that purpose perfectly well. For a year, the bedroom was a clean, functional space where we could sleep, recharge, and then get up the next morning to continue working on the rest of the house. But it had no soul. No warmth. No sense of personality. It felt like a room in a holiday let rather than a room in our home. The lack of storage made it worse — clothes were piled on a chair, shoes lined up against the wall, and the general sense of clutter made the room feel smaller and more transient than it actually was.
The Decision to Stop Living in Limbo
Our original plan had always been to move upstairs eventually. The first floor of the Chartreuse has larger rooms, higher ceilings, and the kind of proportions that would make for a spectacular primary bedroom. But back in September, we took a hard look at the state of the first floor and accepted a difficult truth: it is still at least another year away from being habitable. The structural work up there is significant, and we simply cannot rush it.
That realisation was actually quite liberating. Instead of treating our current bedroom as a temporary stopgap — a room we could tolerate because we would be leaving it soon — we decided to invest in it properly. We would make it ours. We would give it the attention and personality it deserved. If we were going to be sleeping in this room for another year or more, it was going to be a room we genuinely loved waking up in.
Designing the Custom Wardrobe and Integrated Headboard
The single biggest problem with the room was storage, or rather the complete absence of it. There was nowhere to put clothes, nowhere to put shoes, nowhere to put the everyday items that accumulate in a bedroom. Everything was out in the open, and it made the room feel chaotic regardless of how tidy we tried to keep it.
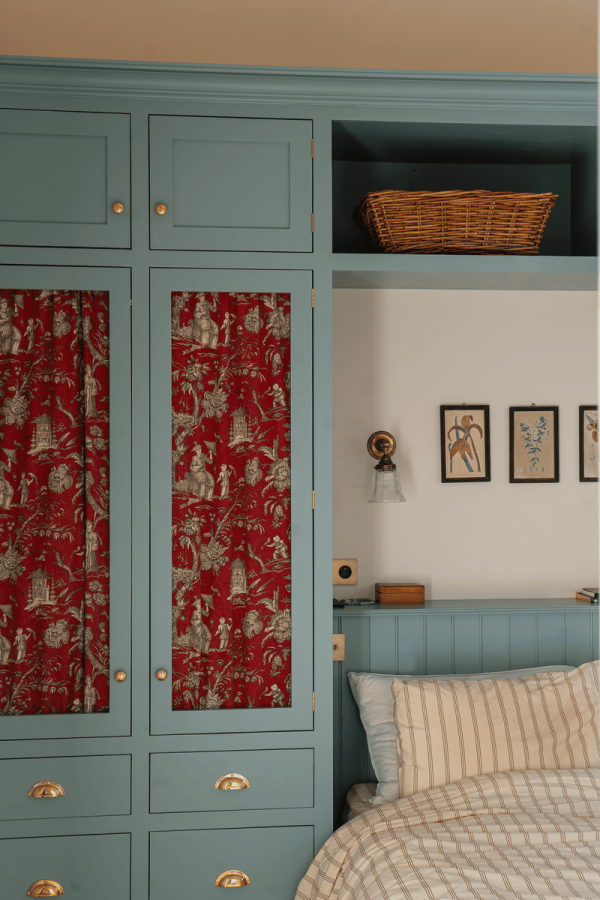
The solution we came up with was a custom-built wardrobe that wraps around the bed, incorporating an integrated headboard. Rather than having a freestanding wardrobe taking up floor space on one side of the room and a separate headboard against the wall, we designed a single structure that does both jobs at once. The wardrobe sections flank the bed on either side, providing generous hanging and shelf space, while the central section behind the bed serves as the headboard, with a shelf along the top for books, a lamp, and the small items you want within arm’s reach at night.
Hugo built the entire structure from scratch. This was a serious piece of joinery — not least because the walls and floor in a 200-year-old house are not level or square in any direction. Every measurement had to be taken in situ, every angle checked and rechecked. There may have been some muttering about spirit levels and the gap between theoretical carpentry and the reality of old French buildings. But the finished structure fits the room perfectly, looks like it has always been there, and provides more storage than we have ever had in a bedroom.
Choosing the Paint: Farrow and Ball Dimity and Sardine
With the wardrobe structure built, it was time to address the colour situation. Goodbye, decision-fatigue white. Hello, actual considered choices.
Dimity for the Walls
For the walls and ceiling, we chose Dimity by Farrow and Ball. It is a warm neutral — not white, not cream, but somewhere in between with the faintest blush of pink that only really reveals itself in certain lights. It has a depth and warmth that plain white completely lacks. In the soft morning light that comes through the bedroom window, it glows. In the evening, by lamplight, it feels cosy and enveloping. It is one of those colours that is difficult to describe on a screen but immediately makes sense when you see it on a wall in a real room with real light.
Choosing paint for old stone buildings requires a slightly different approach than choosing paint for modern plasterboard walls. The texture of lime render, the slight unevenness of the surfaces, and the way light plays across non-flat walls all affect how a colour reads. Flat, cool colours can look harsh and institutional. Warm, nuanced colours respond to the irregularities of the walls in a way that feels natural and sympathetic. Dimity strikes exactly the right balance for this room.
Sardine for the Wardrobe
For the wardrobe structure, we wanted something more dramatic. We chose Sardine, also by Farrow and Ball. It is a deep blue-grey — moody without being dark, sophisticated without being cold. Against the warm Dimity walls, it creates a beautiful contrast that gives the room a sense of layering and depth. The wardrobe structure goes from being a functional storage solution to a genuine design feature, an anchor point that draws the eye and gives the room its character.
Applying Farrow and Ball paint to raw timber requires proper preparation — a good primer coat, light sanding between coats, and patience. The coverage is excellent and the depth of colour is remarkable, but you need to put in the preparation work to get a truly professional finish. Two coats of the Sardine over a suitable primer gave us the rich, even coverage we were after.
The Textiles: Vintage Finds and The Hues Curtains
If paint provides the bones of a room’s colour scheme, textiles provide the flesh. They are what make a room feel finished, layered, and lived-in rather than decorated.
The Car Boot Sale Fabric
The fabric for the wardrobe panels came from the most unlikely source: a car boot sale. We were browsing on a Sunday morning — more for the ritual of it than with any specific purchase in mind — when we spotted a roll of the most stunning vintage fabric. The pattern, the colour, the weight of it — everything was perfect. It was one of those finds that makes you understand why people get addicted to flea markets and brocantes. The fabric was in excellent condition and there was enough of it to cover all the wardrobe panels with some to spare.
Using fabric panels instead of solid doors on a wardrobe serves both practical and aesthetic purposes. Practically, they are lighter than wooden doors, easier to open and close, and allow a tiny amount of air circulation that helps keep clothes fresh. Aesthetically, they soften the structure, add pattern and texture, and create a visual link between the built furniture and the soft furnishings elsewhere in the room. The vintage fabric gives the wardrobe a character that plain painted doors could never achieve.
Curtains from The Hues
The curtains were supplied by The Hues, and they were the final piece of the puzzle. We chose a striped design that picks up the tones in both the wall colour and the wardrobe paint, tying the whole scheme together. Good curtains do so much more than cover a window — they frame the light, add height to a room, introduce movement and softness, and provide a visual full stop that tells your eye the room is complete.
The quality of The Hues curtains is excellent. The fabric has a lovely weight and drape, the lining is properly opaque for a bedroom, and the stripes add a subtle rhythm to the room without being overpowering. Hung on a simple pole above the window, they transformed the window from a functional opening into a feature.
The Finished Room: Before and After
Standing in the finished bedroom and comparing it to what we started with is almost surreal. The journey from mouldy, plasterboard-clad walls and a hole that let in the weather to a warm, characterful, beautifully finished room has taken the best part of two years if you count the structural work, or about three months for the most recent decorative transformation.
The room now feels completely different. The Dimity walls glow with warmth. The Sardine wardrobe anchors the space and provides all the storage we need. The vintage fabric panels add personality and history. The curtains frame the window beautifully. And beneath it all, those original 200-year-old floorboards ground the room in the history of the house, reminding us with every step that this building has stories to tell that go far beyond our own.
What strikes us most is how much the room now feels like it belongs to us. The all-white phase was necessary — it got us into the house — but it never felt personal. This room, with its carefully chosen colours, its hand-built furniture, its vintage finds, and its considered details, feels like a genuine reflection of who we are and how we want to live in this old house.
Lessons Learned from the Bedroom Renovation
Every room we tackle in the Chartreuse teaches us something, and this bedroom has been no exception. Here are the key takeaways:
Fix the structure before you decorate. It is tempting to skip ahead to the fun parts — the paint, the furniture, the accessories — but if the gutters are leaking, the windows are draughty, and the walls are damp, no amount of decoration will save you. Address the root causes first, even when it feels tedious and unglamorous. The decorating will mean so much more when you know the bones of the room are sound.
Decision fatigue is real, and it is okay to make temporary choices. We painted everything white because we had nothing left to give. And that was fine. It gave us a liveable room when we needed one. The important thing is not to let temporary become permanent by default. When you are ready, come back and make the room what you actually want it to be.
Custom-built furniture is worth the effort in old houses. Nothing in a 200-year-old building is level, square, or standard-sized. Off-the-shelf furniture often looks awkward in these spaces, with visible gaps, misaligned edges, and a general sense of not belonging. Building something bespoke that accounts for the quirks of the building takes more time and skill, but the result looks intentional and permanent in a way that flat-pack furniture never can.
Do not underestimate the power of colour. The difference between the all-white room and the Dimity-and-Sardine room is transformative, yet we are talking about the same four walls, the same floor, the same window. Colour has the power to completely change how a space feels — warmer, cosier, more personal, more alive. If your room feels bland, colour is probably the single most impactful change you can make.
The best finds are often unplanned. The vintage fabric from the car boot sale was not something we went looking for. We stumbled across it, recognised that it was perfect, and bought it on the spot. Keeping your eyes open — at brocantes, vide-greniers, charity shops, and car boot sales — is one of the great pleasures of decorating a house like this. You never know when you will find the thing that makes a room.
What Comes Next
The bedroom is done, but the Chartreuse is far from finished. Every completed room gives us energy and motivation to tackle the next challenge, and there is no shortage of challenges in a house this old. The first floor is calling, with its own set of structural puzzles, and the garden has plans of its own that involve rather more digging than either of us would prefer.
But for now, we are going to enjoy our bedroom. We are going to enjoy having a room that feels genuinely finished — not just habitable, but truly ours. After two years of renovation, those moments of completion are precious, and we intend to savour this one.
You can watch the full before-and-after transformation in our latest video on YouTube. Head over to the video to see every stage of the project brought to life.